Complete Phone Screen Repair Guide

Professional-grade DIY instructions for iPhone, Samsung, and Android screen replacement with safety tips and tool recommendations

🛠️ Professional Tools 📱 All Phone Models ⚡ 45-Min Repair 💰 Save $100-300

🛠️ Essential Phone Repair Tools

MUST HAVE

Professional Repair Kit

• Precision screwdrivers (Phillips, Pentalobe, Tri-point)

• Screen opening tools

• Suction cups & prying tools

• Anti-static mat

Perfect for beginners
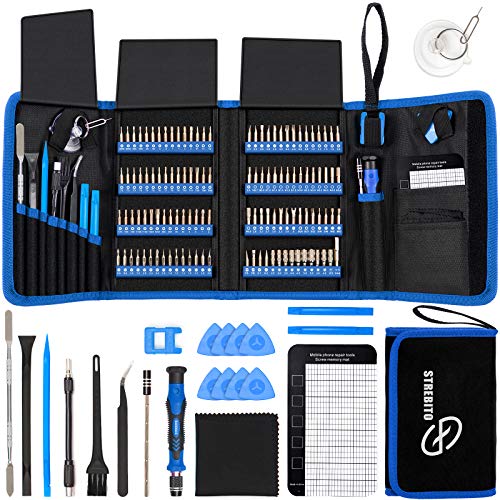
Get Repair Kit →
SAFETY

Heat Gun & Safety Kit

• Adjustable heat gun

• Anti-static wrist strap

• Safety glasses

• Work gloves

Professional grade
Shop Safety Kit →
WORKSPACE

Phone Repair Mat & Stand

• Magnetic screw tray

• Heat-resistant mat

• Phone holding clamps

• Part organizer

Stay organized
Get Workspace Kit →
⚠️

Safety First: Important Warnings

  • Risk of electric shock: Always power off and disconnect battery before starting
  • Sharp glass: Wear safety glasses and gloves when handling cracked screens
  • Warranty void: Opening your phone voids manufacturer warranty
  • Data backup: Always backup your data before attempting repairs
  • Heat damage: Use controlled heat sources only - avoid open flames

Supported Phone Models

📱 iPhone Models

  • • iPhone 15 / 15 Pro / 15 Pro Max
  • • iPhone 14 / 14 Pro / 14 Pro Max
  • • iPhone 13 / 13 Pro / 13 Pro Max
  • • iPhone 12 / 12 Pro / 12 Pro Max
  • • iPhone 11 / 11 Pro / 11 Pro Max
  • • iPhone XS / XS Max / XR / X
  • • iPhone 8 / 8 Plus / 7 / 7 Plus

📱 Samsung Galaxy

  • • Galaxy S24 / S24+ / S24 Ultra
  • • Galaxy S23 / S23+ / S23 Ultra
  • • Galaxy S22 / S22+ / S22 Ultra
  • • Galaxy S21 / S21+ / S21 Ultra
  • • Galaxy Note 20 / Note 20 Ultra
  • • Galaxy A series (A54, A34, A14)
  • • Galaxy Z Fold / Z Flip series

📱 Other Android

  • • Google Pixel 8 / 8 Pro / 7 / 7 Pro
  • • OnePlus 12 / 11 / 10 Pro
  • • Xiaomi Mi / Redmi series
  • • LG V60 / G8 / G7
  • • Motorola Edge / Moto G series
  • • Sony Xperia 1 / 5 / 10
  • • Most Android devices with removable screens

Step-by-Step Repair Process

1

Preparation & Safety Setup

  • • Power off phone completely and remove SIM card
  • • Set up clean, well-lit workspace with anti-static mat
  • • Gather all tools and organize screws by size
  • • Put on safety glasses and anti-static wrist strap
  • • Have replacement screen and adhesive ready
Pro Tip: Take photos at each step to remember cable positions and screw locations.
2

Remove Back Panel & Disconnect Battery

  • • Use appropriate screwdriver for your phone model (Pentalobe for iPhone, Phillips for most Android)
  • • Apply gentle heat to soften adhesive (60-80°C)
  • • Insert suction cup and prying tool to create gap
  • • Work around edges slowly to avoid cable damage
  • • Disconnect battery connector first (critical safety step)
Warning: Never skip disconnecting the battery - this prevents short circuits.
3

Disconnect Screen Cables

  • • Locate display connector cables (usually 2-4 cables)
  • • Use plastic tool to gently lift connector clips
  • • Pull cables straight out - never at an angle
  • • Remove any brackets or shields covering connectors
  • • Keep track of cable routing for reassembly
iPhone Specific: Watch for tiny screws securing connector brackets - they're easy to lose.
4

Remove Damaged Screen

  • • Apply controlled heat to screen edges to soften adhesive
  • • Use suction cup on intact area of screen
  • • Insert thin prying tools around perimeter
  • • Work slowly - rushing causes more cracks
  • • If heavily cracked, apply clear tape first for safety
Safety: Wear gloves when handling broken glass. Dispose of old screen properly.
5

Install New Screen

  • • Clean all adhesive residue from phone frame
  • • Apply new adhesive strips around screen perimeter
  • • Connect screen cables before final placement
  • • Test screen function before sealing
  • • Press firmly around edges to secure adhesive
Quality Check: Test touch response, colors, and brightness before final assembly.
6

Final Assembly & Testing

  • • Reconnect battery (last connection to make)
  • • Replace all internal brackets and shields
  • • Install back panel with proper screws
  • • Power on and test all functions
  • • Check cameras, speakers, touch response, Face ID/fingerprint
Final Test: Let phone run for 30 minutes to ensure no overheating issues.

Common Issues & Troubleshooting

❌ Screen Not Working

  • No Display: Check cable connections, ensure battery is connected
  • Touch Not Working: Verify digitizer cable is properly seated
  • Flickering: Loose connection or damaged cable
  • Dead Spots: May indicate defective replacement screen

⚠️ Assembly Issues

  • Won't Power On: Battery not connected or damaged during repair
  • Buttons Stuck: Check alignment of power/volume buttons
  • Speaker Muffled: Ensure speaker grille is not blocked
  • Camera Issues: Clean lens, check cable connections

Cost Breakdown: DIY vs Professional Repair

Phone Model DIY Cost Shop Repair Savings Difficulty
iPhone 15 Pro $80-120 $300-400 $180-280 🔧🔧🔧 Hard
Samsung S24 $60-100 $250-350 $150-250 🔧🔧 Medium
iPhone 12 $50-80 $200-280 $120-200 🔧🔧 Medium
Pixel 8 $45-75 $180-250 $105-175 🔧 Easy

⚠️ When You Should NOT Attempt DIY Repair

  • • Phone is still under warranty (use official repair instead)
  • • Water damage is present (needs professional cleaning first)
  • • Multiple components are damaged (may not be cost-effective)
  • • You don't have proper tools or workspace
  • • Phone contains important data you haven't backed up
  • • You're not comfortable working with small electronic components

Ready to Start Your Phone Repair?

Test your current phone first, then get the professional tools needed for a successful repair.